As a Yoga Therapist and Teacher, I witness the healing power of yoga every day.
This healing power comes from yoga’s ability to empower people to transform: relieving aches and pains, healing injury, shifting deeply held habits, altering patterns of stress or uncertainty, and connecting to the body, mind, heart, and life.
But at the same time, I know that yoga can feel intimidating. You might hear the words “yoga studio” and think to yourself, “I’m not flexible or fit enough to attend a class.”
I get it. When you see yoga on TV or in a magazine ad, it’s always fit — super bendy — young women (or some guy looking overly clumsy), and it’s easy to think you have to look like that to have a practice. When in reality, yoga is for everyone…
Regardless of body type, fitness level, or yes, even flexibility.
And one of the great things you’ll learn about yoga is that it is non-competitive by nature. If you can embody this mindset from your first class, you will be setting yourself up to reap the most benefits from your yoga practice.
Yoga has helped heal me and make me stronger, both mentally and physically, and I have dedicated my adult life to teaching and introducing others to the power of a regular yoga practice.
To help you gain the confidence you may need before attending the class, I’ve selected ten common poses you could expect from many yoga classes to give you a great idea of what it will be like attending a class. (Want to put them all together? Check out the starter sequence here.)
Practice these a few times, and you’ll be more than ready for any beginners class out there.
How to Prepare for Your First Yoga Class
Before we jump into the postures though, let’s clear up some of the mystery or uncertainty about what goes on in a typical class and how you can prepare for your first class or feel more prepared next time you attend a class.
Here are tips to help you get the most from your yoga classes.
What to Bring
One of the great things about yoga is that you don’t need a ton of fancy gear to go to a yoga class. You really just need a few items, and the studio will likely provide most of it:
- Proper clothing: The best yoga apparel provides breathability, stretch, and coverage. Stretchy materials will allow you to bend, move, and twist with ease. Breathable fabrics will wick away your sweat and keep you cool and dry, especially in heated or more intense classes. Remember, you may go upside down (like in Downward Facing Dog), so clothes that are somewhat fitted can help keep your shirt or shorts in place so you aren’t distracted by constantly readjusting your clothing.
- Mat: If the studio doesn’t provide mats, you should bring one. They provide traction, padding, and a sense of space as you learn how to align your body in yoga poses. You can start with an inexpensive or borrowed mat.
- Water: Some people like to have a bottle of water, but check with the studio to see if you can bring it into the practice room with you.
- Small towel: If you think you might get sweaty, a towel might come in handy.
Eating and Drinking Before Class
Just like you wouldn’t go for a run immediately after eating a large burrito, you don’t want to do yoga on a full stomach. I recommend to not eat for about two hours before class. If you must have a little something closer to the start time, pick a small food that’s dense like a handful of nuts or banana, so you don’t feel the food in your belly when you are trying to move into a deep twist or upside down.
Similarly, drinking too much water before class can make you feel queasy. Hydrate well during the day, but avoid drinking a lot of water right before class. Some studios allow you to bring water in with you, but I only recommend it if you are taking a warm or hot class and don’t think you can make it through without it.
Reach Out to the Studio
New styles of yoga are popping up daily, so take the time to read class descriptions online and call the studio before you take a class to make sure it is beginner friendly and suits your needs. When you call, you can also find out if they provide mats free, rent them for a small fee, or if you need to bring your own.
It’s always a good idea to arrive ~15 minutes before class begins so you can fill out any paperwork (most studios have a short waiver), get oriented to the space, talk to the teacher, and find a spot for your mat in the studio. Many beginner yogis prefer a spot in the back of the room so they can see what others are doing, but choose a location that feels comfortable to you.
Use Yoga Props to Enhance Your Practice
In addition to the yoga mat, many studios provide a selection of props that will be cued by the teacher during a class. I love using props in my practice because they make postures more accessible in my body, support me in deeply restorative postures, or help me find alignment in a new way. Some common yoga props include:
- Blocks, which provide the support or height you need to do poses safely and effectively.
- Straps, which allow you to reach limbs that you might be able to otherwise, and provide resistance for a deeper stretch.
- Blankets, which provide lift and padding in key places.
- Bolsters, big firm pillows that you can use to support your body in varying shapes for deep relaxation.
I encourage all students to incorporate props into many of their poses. They allow you to receive the most benefit from a posture and in many cases do it more safely.
Drop Your Ego
You’ve finally settled onto your mat. The few minutes before class is a good time to relax (on your back or seated), stretch, or check in with your body.
Here are three things to keep in mind as class begins:
- Honor your edge. Be sure that when you’re moving into new postures, you are feeling stretching or strengthening — not pushing into sharp or shooting pain.
- Don’t compare yourself to others. Yoga is a highly personal experience and every body has its own inherent range of motion; don’t try to make your poses look like the person next to you in class, but find each pose in a way that is safest for your body.
- If you need a break, take it. Come on to your back, into Child’s Pose, or any other position that feels restful for you. Keep your goals in mind, staying connected to your intention. Did you come to class to injure yourself? Or to honor yourself and evolve?
And finally, yoga has a sharp learning curve. I recommend taking at least 5-10 classes before deciding if it is for you. Yoga is a lifelong practice, there is always more to learn. It can serve you differently depending on your needs. Find the studio, class, and teacher that resonate with you and enjoy the journey.
10 Common Yoga Postures
There are thousands of yoga postures (asanas) and new ones being created all the time. Below you’ll find foundational postures, most of which you will find in a Sun Salutation, a fundamental sequence of poses found in many yoga classes. I’ve chosen these as an introduction to the types of asanas you’ll find in most yoga classes, and my hope is that by getting familiar with these, you’ll gain confidence for when you step on the mat in your first class.
That said, not every posture is for everybody. The descriptions below provide basic alignment principles and benefits of each posture. Try them on your own, but fine tune them with the support of a trained teacher. If you have injury or other medical conditions, consult a teacher to find out if a posture is contraindicated for you.
Yoga postures can also be modified to fit your needs — with variations to fit your body, with props, in a chair, at a wall, or even in water. The beauty of yoga is that it can be adapted for everyone. If these postures don’t fit your needs or feel right to you, continue exploring others until you find those that do.
1. Mountain Pose (Tadasana)
Mountain Pose is the human body’s ideal standing alignment. It can help undo the patterns formed in the body from sitting or other repetitive movements or asymmetrical habits. It is grounding, calming, and energizing.

Find Your Mountain Pose:
- Stand with your feet hip-width apart.
- Place a micro bend in your knees, engaging your quads to draw your knee caps upward.
- Draw your low belly in and up toward your spine to engage your core and stabilize your pelvis.
- Lift the center of your chest straight up and broaden across your collarbones.
- Draw the nape of your neck back and lengthen the top of your head upward.
- Turn your palms to face forward in anatomical position.
Benefits:
- Improves posture.
- Deepens breath.
- Strengthens feet, ankles, legs, hips, core, back, shoulders, and neck.
2. Forward Fold (Uttanasana)
We tend to “forward fold” a lot in our day: sitting, laying on our side with the knees drawn in, bending down to pick things up. When done incorrectly, a Forward Fold can cause back and hip strain, and even injury. When done properly, forward folding is beneficial to the mind, body, and breath.
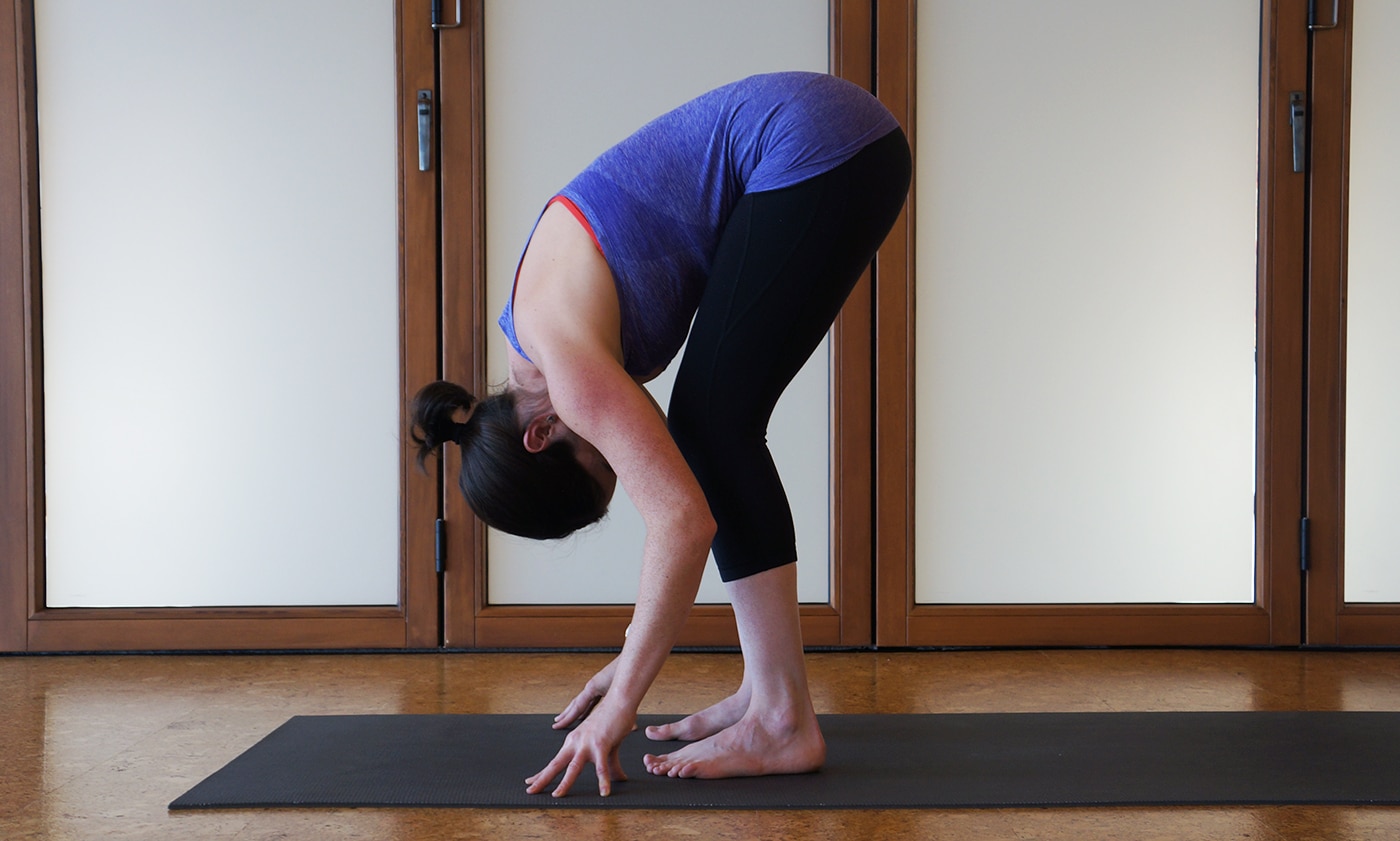
Find Your Forward Fold:
- From Mountain Pose, place your hands on your hips, put a bend in your knees, and hinge from the hips to fold forward. The key is to fold from hips not the waist (i.e., don’t round your back to fold forward). Allow the pelvis to rotate around the femur bones. This may mean you don’t go as far, and that is great as you are finding the posture with anatomical integrity.
- Your hands can stay on your hips as you fold, or lower to the floor. There are many variations for the arms that you can explore as you take classes.
- To elongate the hamstrings, engage the quadriceps. To decompress the spine, bend the knees until your upper body can hang down toward the floor, allowing the head to release downward too.
Benefits:
- Decompresses the spine and keeps it flexible.
- Moves blood to heart and brain.
- Lengthens your back body including hamstrings and back muscles.
- Calms the nervous system.
3. Lunge (Anjaneyasana)
Often referred to as a runner’s lunge, this posture will feel great after a run or bike ride. A deep hip opener, the Lunge is a common yoga posture found in many Sun Salutations and yoga flows.
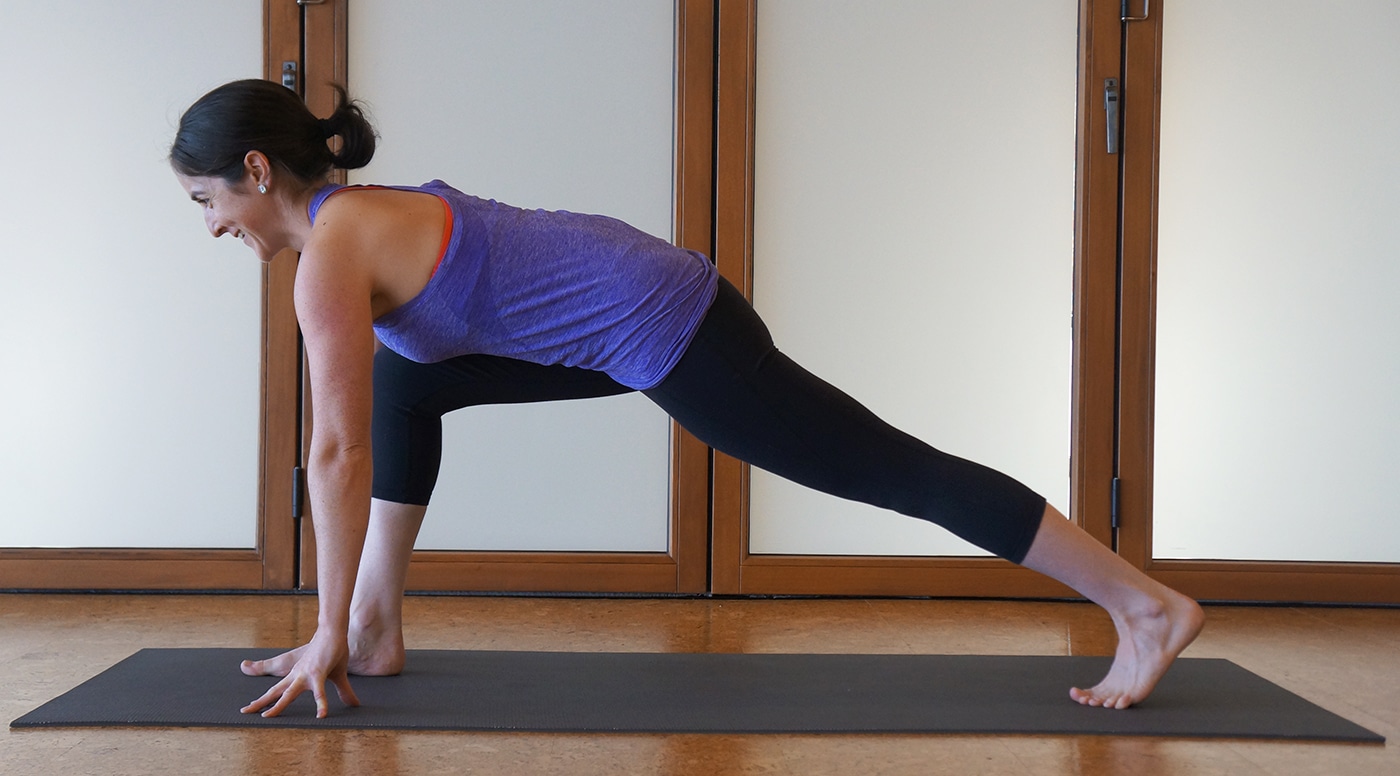
Find Your Lunge:
- From your Forward Fold, bend your knees until your hands are on the floor.
- Step your left foot back about 3-4 feet behind you, keeping the feet hip-width apart. Your front knee is stacked over your front ankle.
- Place your hands on either side of your front foot, you can lift onto fingertips if it is difficult the reach the floor.
- Lengthen your torso and the top of your head forward to elongate your spine. Gaze at the floor a foot in front of you.
- Your back knee can be up or down. If it is up, lift your back thigh up to engage your leg, and squeeze your inner thighs together to stabilize your hips.
- Repeat on the right side.
Benefits:
- Stretches hips and hip flexors.
- Strengthens legs, hips, back, and arms.
4. Plank (Phalakasana)
Plank is an arm balance and great for increasing strength. It’s also part of the Sun Salutation, so you will see it and its relatives, Forearm and Side Plank, in many flow yoga classes.
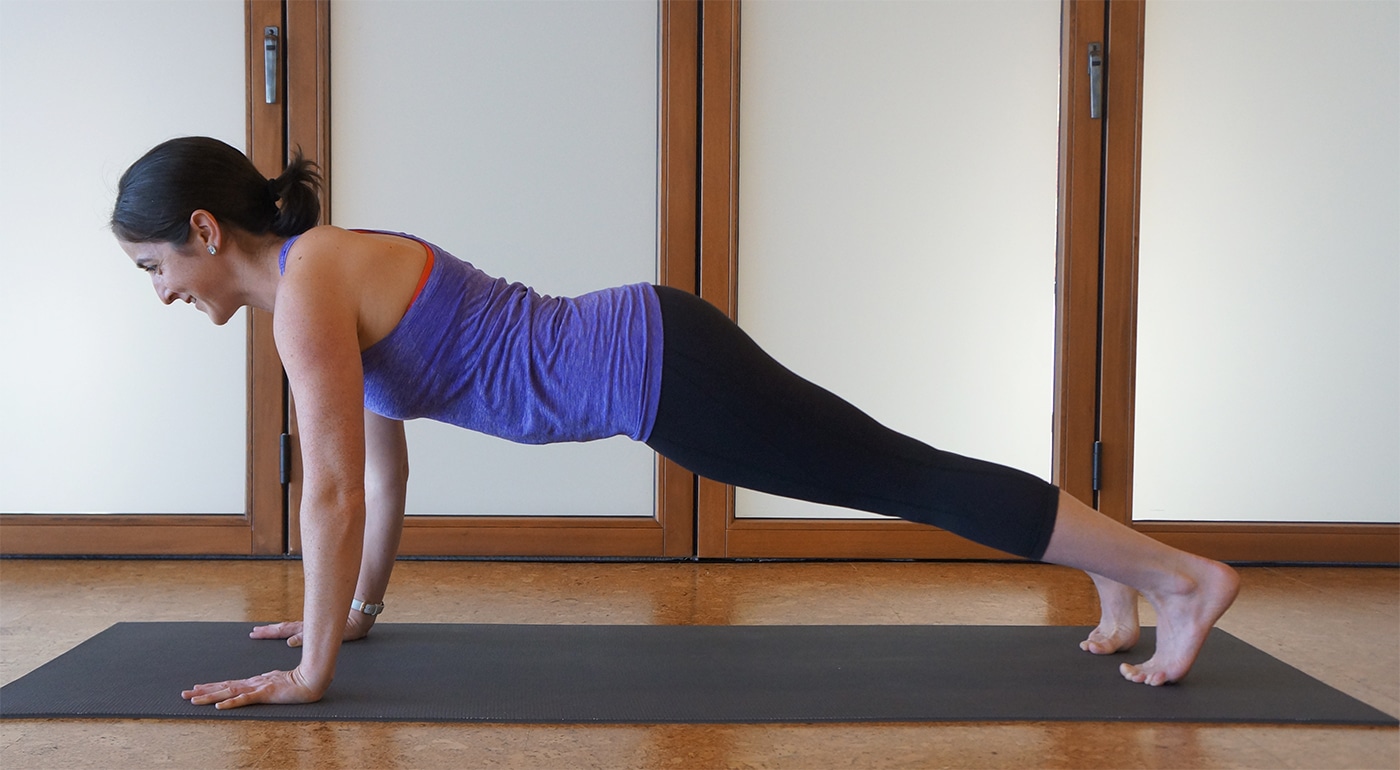
Find Your Plank:
- From your Lunge, step your front foot back so you are at the top of a push up, knees up or down.
- Your shoulders should be slightly behind your wrists, with a small bend in your elbows. Press your hands into the floor.
- Look about a foot in front of you so your head isn’t hanging down.
- The body is in one straight line, so if your hips are lifted (like in Downdog) or sagging, engage your core to bring them to center.
- Find your Mountain Pose alignment: feet hip-width, and if knees are lifted, press through your heels like you are standing on your feet; quads engaged; low belly drawing in and up; broaden the collarbones and reach the crown of your head away from your shoulders.
Benefits:
- Strengthens arms, shoulders, core, legs, ankles, and feet.
5. Cobra (Bhujangasana)
A gentle backbend or spinal extension, Cobra Pose can be great for back health, reversing the effects of sitting too much, and energizing the mind and body.
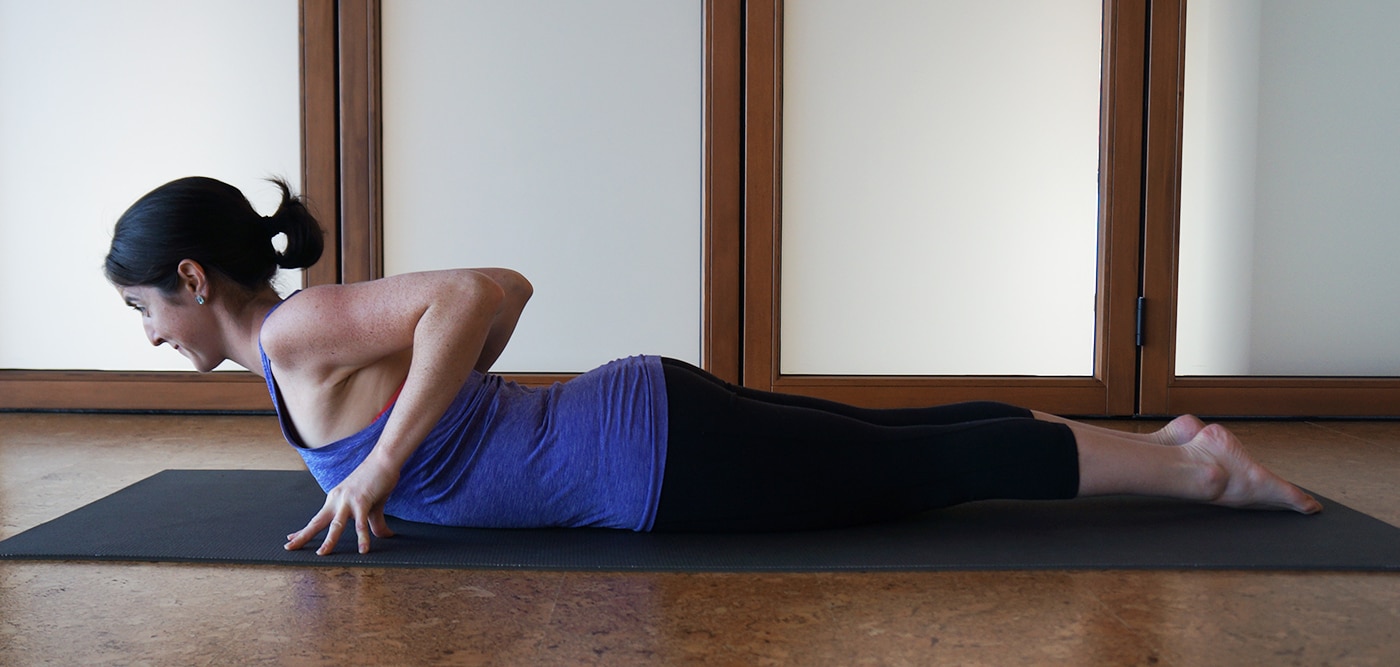
Find Your Cobra:
- From Plank, lower to your belly.
- Uncurl your toes, pressing the tops of the feet into the floor.
- Place your hands under your shoulders, elbows bent and drawing toward your ribs.
- Use the strength of your back to lift your head and shoulders up, lengthening your chest forward.
- Gaze just out in front of you, not tilting the head too far back but rather letting it be a natural extension of the spine.
Benefits:
- Stretches shoulders, chest, and abdominal muscles.
- Strengthens your arms, shoulders, and back.
- Increases mobility in lower back.
6. Down Dog (Adho Mukha Svanasana)
The most well-known yoga posture, Downward Facing Dog, is probably also one of the hardest and most awkward yoga poses to learn. It also greatly benefits your body when done correctly. Follow the alignment cues below, but also consult a yoga teacher or therapist to ensure you have the right alignment for your body.
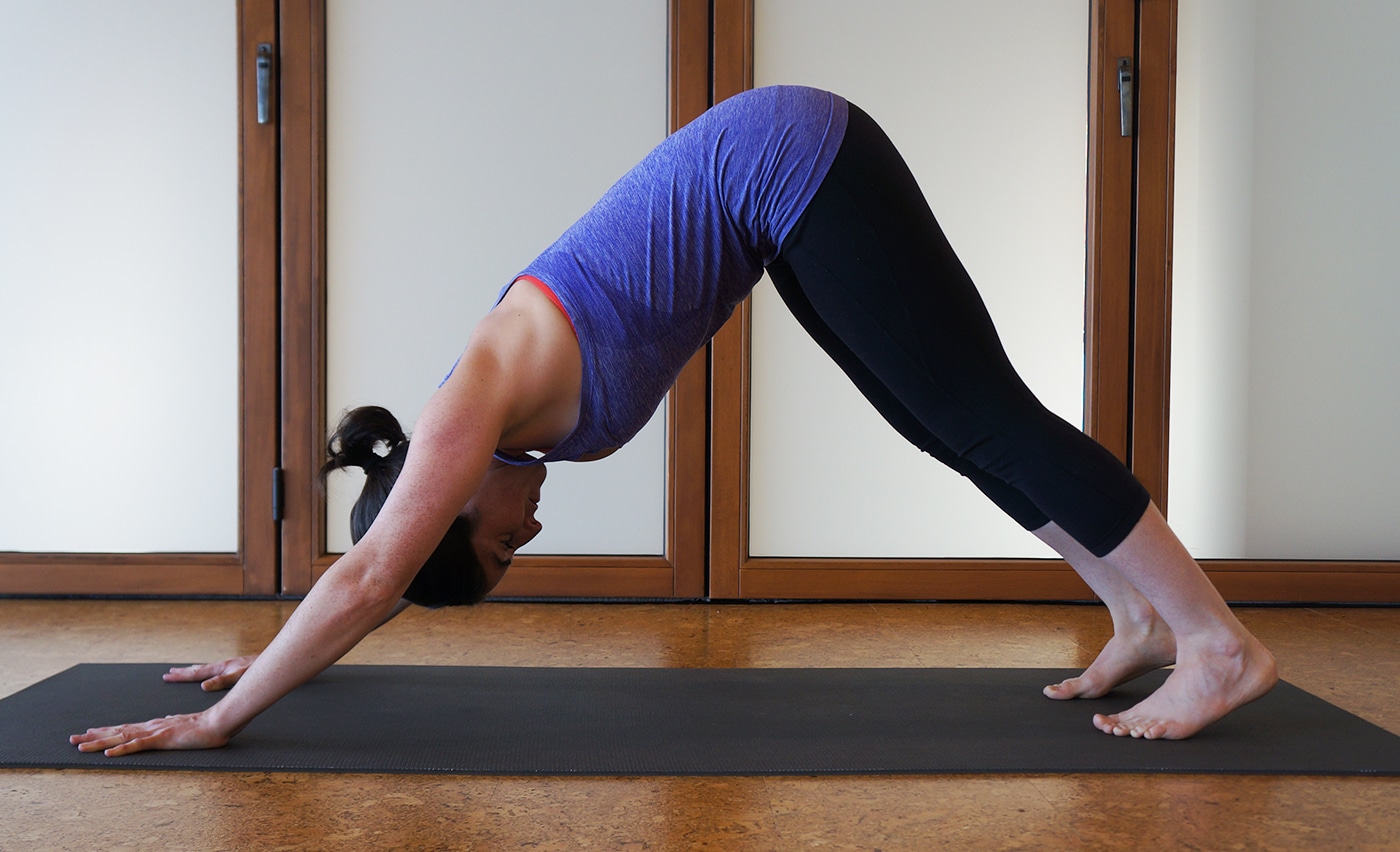
Find Your Downward Facing Dog:
- Begin in table position (on hands and knees). The hands should be shoulder-width or wider apart. The knees and feet should be hip-width apart.
- Spread your fingers wide and push the hands firmly into the ground. The index fingers should point straight ahead at 12 o’clock. Connect the full hand with the floor.
- Curl your toes under, lifting your hips up and back, moving toward straight legs — but you can keep a bend in the knees, especially if you have tight hamstrings.
- Firm your thighs back, draw your inner thighs back to find an internal rotation in the upper legs, and release your heels down toward the ground; they don’t have to touch.
- Place a small bend in your elbows straight back toward your thighs. Then draw the elbows toward your midline, engaging your shoulders and upper back.
- Allow the neck to be long, gazing just in front of the feet.
Benefits:
- Strengthens the hands, wrists, arms, back, core, and legs. It pretty much works the entire body.
- Lengthens and stretches the legs, spine, and arms. This helps to relieve pain throughout the body.
- Reverses the action of gravity on your body (since it is an inversion), which gets the blood and lymph flowing in opposite directions and takes pressure off the heart, which works so hard all day to pump blood to the brain.
- Relieves fatigue and rejuvenates the body and mind.
Allow yourself time to find downward facing dog in your body. It never comes easily but once you’ve found it, you will know. And it will feel great.
7. Warrior 1 (Virabhadrasana 1)
Solid. Proud. Grounded. These are the words that come to mind when I think of Warrior 1, a foundational yoga pose. It provides the foot, leg, and hip position for many other poses (e.g., Pyramid Pose, Humble Warrior Pose), and is weaved into Sun Salutations during many flow yoga classes.
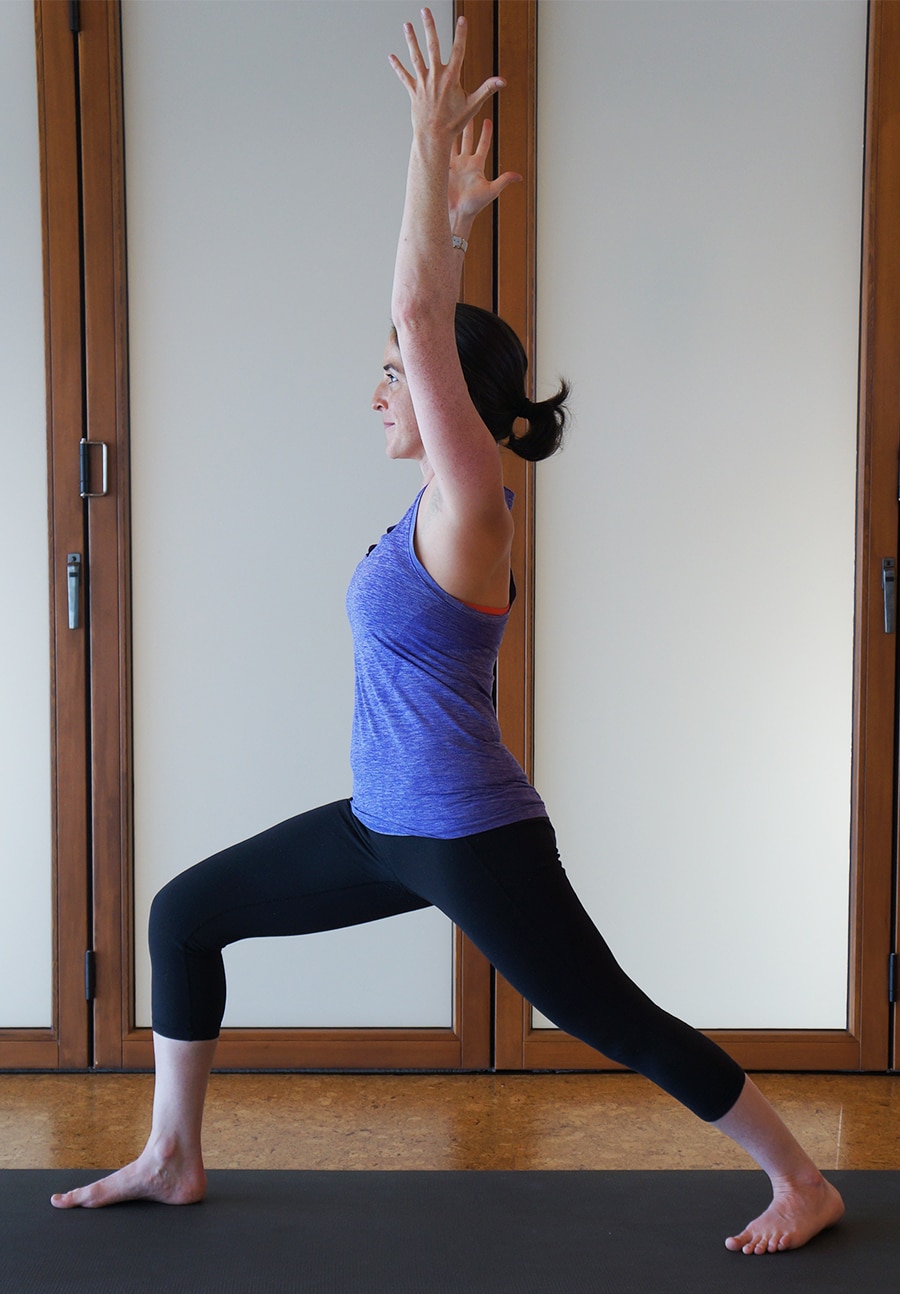
Find Your Warrior 1:
- From standing, step your left foot 3 to 4 feet back. The feet should be hip width apart.
- Angle the back foot so that the toes are facing the top left corner of your yoga mat or a ~45 degree angle. The front foot’s toes are pointing straight ahead.
- The hips are closed, so think about drawing the left hip forward and the right hip back. You are working toward having the hips square to the front of the mat but your body may not allow for this position, which is just fine!
- Bend the front knee so it stacks directly over the ankle, the shin perpendicular to the floor. You can work toward bringing the front thigh parallel to the floor.
- Raise the arms up, just in front of the ears, with the palms facing each other. Pinkie side of the arms and elbows drawing toward each other.
- Gaze straight ahead.
- Repeat on right side.
Everyone will feel this pose in different places. Generally, Warrior 1 stretches the ankle, calves, and thighs as well as the chest and shoulders. This pose also strengthens the legs, hips, arms, and the entire core body.
With the feet planted firmly on the ground and the arms reaching strongly overhead, how can you not feel like a proud warrior in this pose?
8. Warrior 2 (Virabhadrasana 2)
A grounding, energizing, hip opening pose, the base position of Warrior 2 (feet, legs, and hips) provides a foundation for many other asanas (e.g., Reverse Warrior and Extended Side Angle).
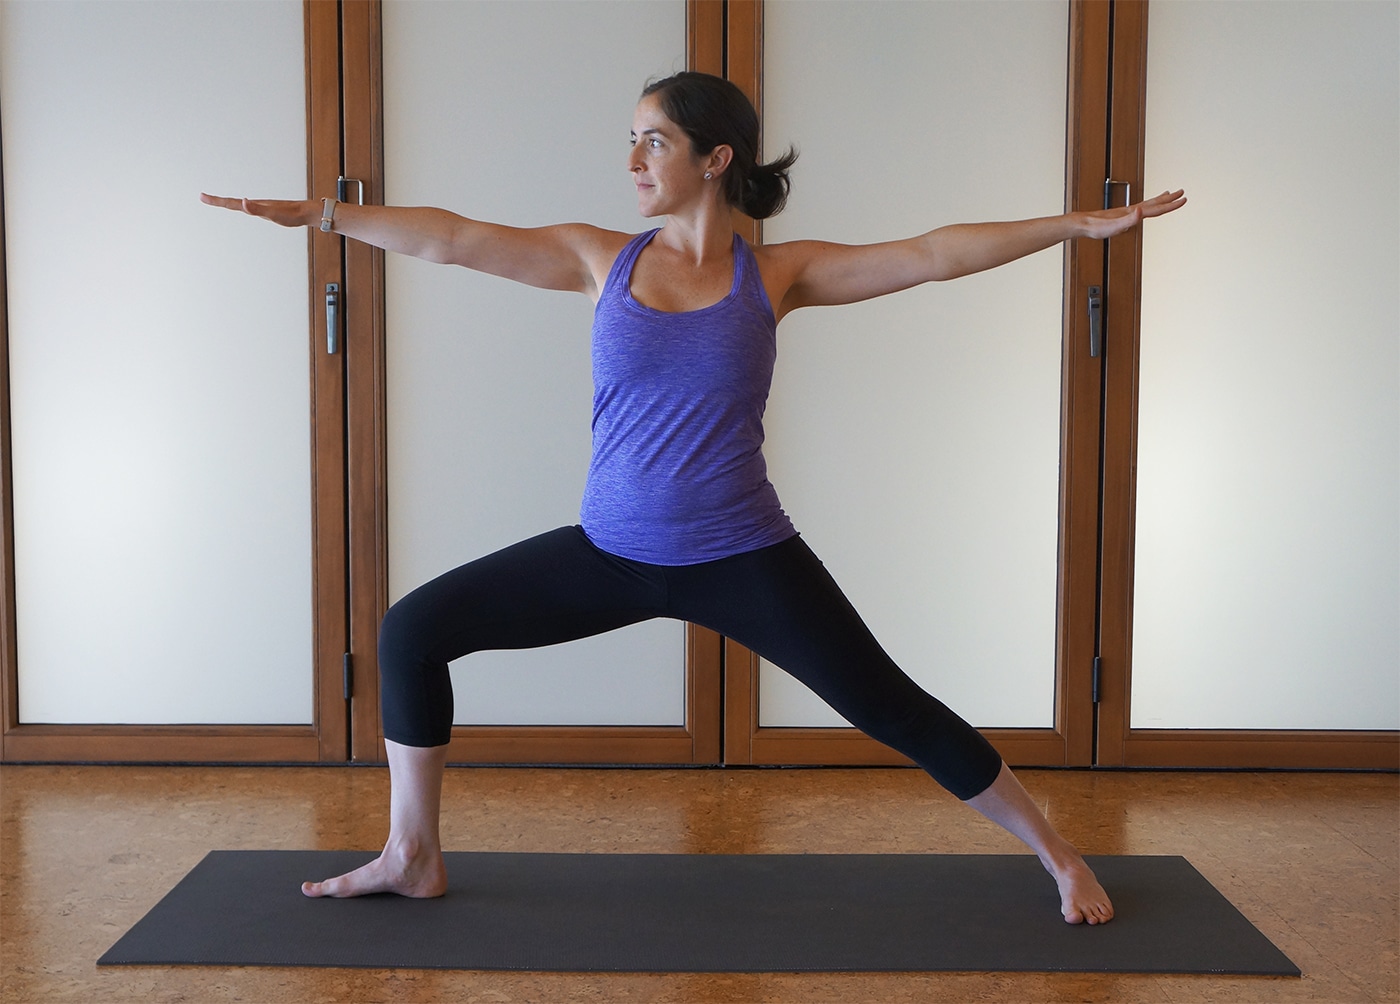
Find Your Warrior 2:
- Start with the feet about 3 to 4 feet apart, feet parallel.
- Turn the right hip, thigh, and foot out so the foot is pointing to the top of your mat.
- The left foot is parallel to the back of the mat or angled to point 45 degrees forward.
- The front foot’s heel should be lined up with the back foot’s heel or the center of the back foot.
- Bend the right knee until it is stacked on top of the right ankle. Track the knee toward the second toe. See how the hips feel here. To deepen the stretch, toe-heel your back foot further back. You are working toward having the front thigh parallel to the floor.
- Engage the back leg as much as the front leg. To do this, root down through the back edge of the back foot.
- With the shoulders stacked over the hips, raise the arms so they form a “T” position with the torso and arms parallel to the floor.
- Engage your low core by drawing your navel in and up toward your spine.
- Gaze over the front fingers.
- Repeat on left side.
Benefits:
- Strengthens the legs, core, and arms.
- Stretches the hips and legs.
- Improves balance.
- Provides physical and mental grounding.
9. Child’s Pose (Balasana)
Yoga is about finding the balance between engagement and ease, both on and off the mat. Child’s Pose is a respite for many, a posture that brings deep relaxation. It is a great posture to take if you need a pause in your day or in a yoga class.
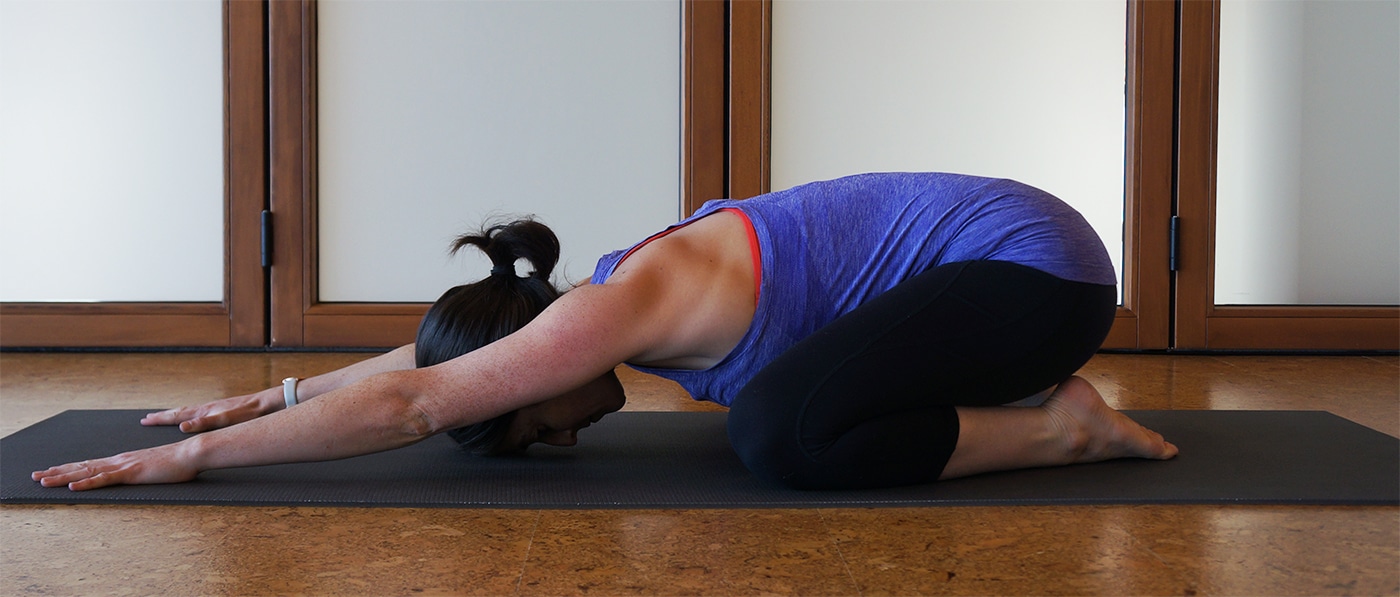
Find Your Child’s Pose:
- From hands and knees, bring your knees wide apart and big toes to touch.
- Sink your hips back toward your heels, they may not touch. If you are tighter in the hips and legs, this posture may be more challenging for you. Try using a blanket between your thighs and lower legs.
- Release your head down toward the floor or your forehead onto a bolster or other support.
- Keep your arms outstretched but walk your hands back until your shoulders are relaxed.
Benefits:
- Stretches your hips, thighs, ankles, and back.
- Relaxes the brain.
10. Corpse Pose (Savasana)
Some yogis think Corpse Pose is the most difficult of all the yoga postures. At the end of most yoga classes, you are led into a supine position and asked to hold it for 2-10 minutes of relaxation. Being still like this can create a great mental and emotional challenge, especially if you aren’t used to the stillness.
It is in this stillness, however, that we cultivate one-pointed concentration that allows us to drop into a meditative state where we are neither asleep nor awake.
This posture gives your body, mind, and soul time to integrate and absorb all of the benefits of your yoga practice. And to find deep relaxation and restoration.
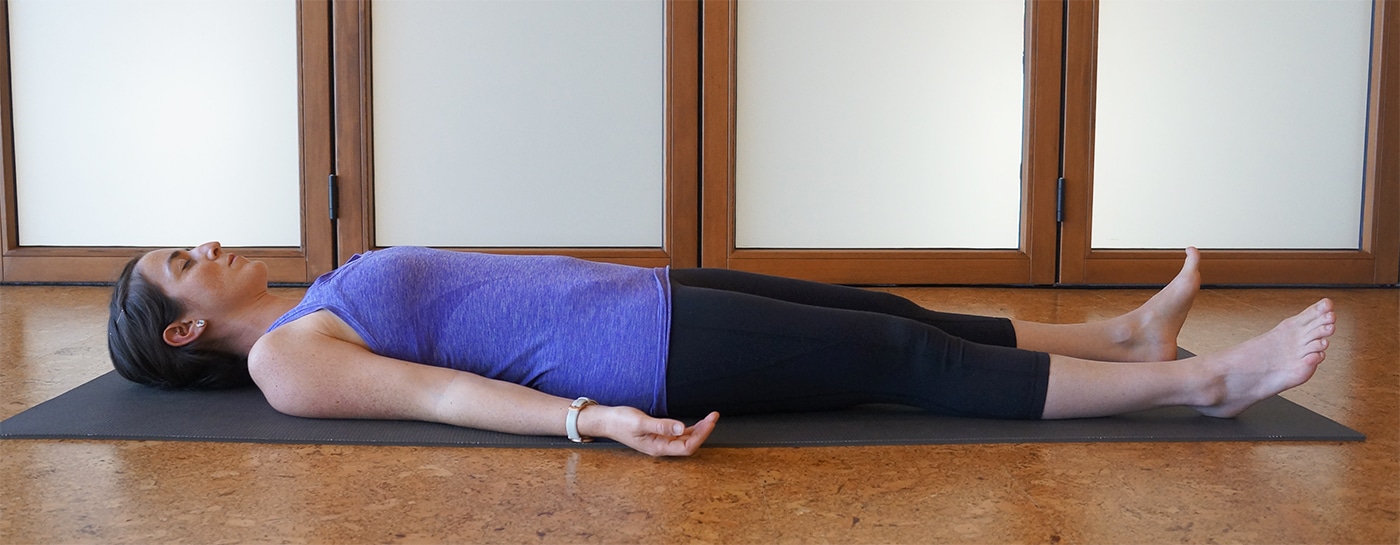
Find Your Corpse Pose:
- On your back, straighten your legs onto the floor, feet about hip-width apart but relaxed.
- Bring your arms 6-12 inches away from your body on the floor palms face up.
- Make any adjustments needed to be comfortable. If having your legs straight brings discomfort into your low back, place a support under your knees. You can also place a short blanket under your head or over your body to calm the nerves and keep the body warm as you rest.
Benefits:
- Calms your mind and relaxes your body.

Find Your Yoga
I remember the first time my husband went to a yoga class. He wouldn’t go with me because he felt embarrassed, and drilled me with dozens of questions about what to expect. He was nervous, which I’ve seen countless times as new yogis come to the studio.
But yoga doesn’t have to be intimidating. Once you get to the studio, the non-competitive atmosphere is welcoming, and each pose and sequence can be adapted to your body and your needs.
My goal with sharing these poses today is to give you a small introduction into the types of movements you’ll likely experience in a yoga class, in hopes that you can ditch those nervous feelings experience the many benefits of yoga in your own life.
Whether you take your first class or set up space in your house to build your own practice around, you’ll soon experience the restorative and transformational effects of this ancient practice.
About the Author: Katie Hay is a practicing Yoga Therapist and Teacher in Black Mountain, NC. She is a certified Yoga Therapist by the International Association of Yoga Therapists and a 500-hour Registered Yoga Teacher. She has been practicing yoga since she was a teen.
The post 10 Essential Yoga Poses to Know Before Your First Class appeared first on No Meat Athlete.


No comments:
Post a Comment